<?xml version="1.0" encoding="utf-8"?><feed xmlns="http://www.w3.org/2005/Atom" ><generator uri="https://jekyllrb.com/" version="4.4.1">Jekyll</generator><link href="https://takios.de/feed.xml" rel="self" type="application/atom+xml" /><link href="https://takios.de/" rel="alternate" type="text/html" /><updated>2026-04-20T22:22:50+02:00</updated><id>https://takios.de/feed.xml</id><title type="html">Takios.de</title><subtitle>Personal site of Takios. Writing about IT and stuff. Created using Jekyll.</subtitle><author><name>Takios</name><email></email></author><entry><title type="html">Fixing MPD HTTP Output Stream ends prematurely</title><link href="https://takios.de/2026/04/20/mpd-httpd-output-stream.html" rel="alternate" type="text/html" title="Fixing MPD HTTP Output Stream ends prematurely" /><published>2026-04-20T18:00:00+02:00</published><updated>2026-04-20T18:00:00+02:00</updated><id>https://takios.de/2026/04/20/mpd-httpd-output-stream</id><content type="html" xml:base="https://takios.de/2026/04/20/mpd-httpd-output-stream.html"><![CDATA[<h2 id="the-problem">The Problem</h2>

<p>The Music Player Demon (MPD) is a handy piece of software. Together with Cantata as a client, it has served my music-listening needs very well for years.
Sadly, I recently ran into a bit of trouble. MPD supports multiple outputs, so instead of just outputting audio to a local pulseaudio server (or pipewire impersonating a pulseaudio server) it can simultaneously output audio as an http stream. As a homeoffice worker, I use this to listen to my music library on my work machine while I am in calls.</p>

<p>However, recently I’ve been running into an issue where the stream would sometimes end when the track is switched.</p>

<div class="language-plaintext highlighter-rouge"><div class="highlight"><pre class="highlight"><code>&gt; mpv http://localhost:8000
● Audio  --aid=1  'Somewhere' (vorbis 2ch 44100 Hz 128 kbps)
File tags:
 Artist: Within Temptation
 Album: The Silent Force
 Album_Artist: Within Temptation
 Composer: Sharon Den Adel
 Date: 2004
 Genre: Hard Rock &amp; Metal
 Title: Somewhere
 Track: 11
AO: [pipewire] 44100Hz stereo 2ch floatp
[ffmpeg] http: Stream ends prematurely at 239048, should be 18446744073709551615
&gt; 
</code></pre></div></div>

<p>I was unable to find many other people having this issue on the internet (prompting me to write this post) and the references I found offered no solution. There was the <a href="ref-1">classic topic marked as SOLVED without the solution posted</a> and a <a href="ref-2">Github discussion mentioning that nobody except radio stations should use the http output anyway</a>, offering Snapcast as an alternative. Looking at Snapcast, I quickly disregarded this solution as it would require a more involved setup and a specific snapcast client instead of using clients like mpv, VLC or just a plain webbrowser.</p>

<p>At the time, I had been using the following configuration in my mpd.conf without problems for years:</p>

<div class="language-plaintext highlighter-rouge"><div class="highlight"><pre class="highlight"><code>audio_output {
        type            "httpd"
        name            "MPD"
        encoder         "vorbis"          # optional, vorbis or lame
        port            "8000"
        bind_to_address "0.0.0.0"         # optional, IPv4 or IPv6
        max_clients     "1"               # optional 0=no limit
}
</code></pre></div></div>

<p>The first promising solution came from the <a href="ref-3">Archlinux forums</a>, suggesting to add the <code class="language-plaintext highlighter-rouge">always_on "yes"</code> option. Subjectively, this seemed to improve but not solve the problem. Other sources that were not specific to MPD but streams cutting off in general suggested an encoding issue so I changed the <code class="language-plaintext highlighter-rouge">encoder "vorbis"</code> to <code class="language-plaintext highlighter-rouge">lame</code>. This brought no improvement at all.</p>

<p>As you can see in the comment in the configuration, it mentions to use “vorbis” or lame”, so at first I disregarded this path for a while. While scrolling through the MPD documentation, I noticed that there are many other encoding plugins available though…</p>

<h2 id="the-solution">The Solution</h2>

<p>Changing the <code class="language-plaintext highlighter-rouge">encoder</code> to <code class="language-plaintext highlighter-rouge">opus</code> with its required configuration finally fixed the problem.</p>

<div class="language-plaintext highlighter-rouge"><div class="highlight"><pre class="highlight"><code>audio_output {
        type            "httpd"
        name            "MPD"
        encoder         "opus"
        port            "8000"
        bind_to_address "0.0.0.0"
        format          "44100:16:1"
        max_clients     "1"
        always_on       "yes"
        opustags        "yes"
}
</code></pre></div></div>]]></content><author><name>Takios</name></author><category term="linux" /><category term="audio" /><summary type="html"><![CDATA[The Problem]]></summary></entry><entry><title type="html">Saltstack on a small scale using salt-ssh</title><link href="https://takios.de/2024/06/22/saltstack-on-a-small-scale.html" rel="alternate" type="text/html" title="Saltstack on a small scale using salt-ssh" /><published>2024-06-22T16:00:00+02:00</published><updated>2024-06-22T16:00:00+02:00</updated><id>https://takios.de/2024/06/22/saltstack-on-a-small-scale</id><content type="html" xml:base="https://takios.de/2024/06/22/saltstack-on-a-small-scale.html"><![CDATA[<p>Saltstack is a configuration management tool to efficiently administrate systems and define for example what packages should be installed on them or how SSH should be configured.
In a usual environment, this is done via an agent on the systems (salt-minion) that connects to a main controlling instance (salt-master). On a smaller scale or if you just do not want to install the salt-minion on the system, salt also offers configuration over plain SSH called salt-ssh.</p>

<p>Following this guide you will setup salt-ssh and get an introduction into configuration management via Saltstack.</p>

<h2 id="setting-up-salt-ssh">Setting up salt-ssh</h2>

<p>First you will need to install the required packages on the system from which you will administrate the minions, e.g. your PC or laptop from which you usually connect to them via ssh (the exact name of the packages might differ depending on what distribution you are using):</p>

<ul>
  <li>salt-master</li>
  <li>salt-ssh</li>
  <li>git</li>
</ul>

<p>The salt-master is needed even if the agentless salt-ssh method is used because salt-ssh uses the same configuration as the salt-master.</p>

<p>Next, create the ssh key that salt-ssh will use to connect to the systems:</p>

<p><code class="language-plaintext highlighter-rouge">ssh-keygen -t rsa -f /etc/salt/pki/master/ssh/salt-ssh.rsa</code></p>

<p>On the minions, add the /etc/salt/pki/master/ssh/salt-ssh.rsa.pub to the authorized_keys file of the root user or a user that has passwordless sudo privileges.<br />
If you use cloud-init, you can use the following user-data example to fully prepare the system to be administrated by salt-ssh:</p>

<div class="language-plaintext highlighter-rouge"><div class="highlight"><pre class="highlight"><code>packages:
  - python3

groups:
  - salt-admin

users:
  - name: salt-admin
    gecos: Salt Admin
    primary_group: salt-admin
    sudo: ALL=(ALL) NOPASSWD:ALL
    lock_passwd: true
    ssh_authorized_keys:
      -  ###publickeyhere###
</code></pre></div></div>

<p>Normally, salt minions sign up with the salt-master but since the salt-minion is not used in this case, we need to make our local salt environment aware of the systems manually. This is done by creating a roster file at /etc/salt/roster. The roster file can configure for each host individually how a connection should be done but in our case the configuration is quite simple:</p>

<div class="language-plaintext highlighter-rouge"><div class="highlight"><pre class="highlight"><code>yourhost.example.com:
  user: salt-admin
  sudo: true
</code></pre></div></div>

<p>This tells salt-ssh that it should use the user salt-admin and execute all commands with sudo when managing the host yourhost.example.com.</p>

<p>To see if everything is set up correctly, you can use the test.ping command:</p>

<div class="language-plaintext highlighter-rouge"><div class="highlight"><pre class="highlight"><code>salt-ssh yourhost.example.com test.ping
</code></pre></div></div>

<p>If this returns True, then congratulations! You can now manage that system via Saltstack!</p>

<h2 id="terminology">Terminology</h2>

<p>Saltstack uses three main types of data to figure out how exactly to configure a client.:</p>

<h3 id="salt-state">Salt State</h3>

<p>A salt state is a definition for one specific configuration you want the minion to have. This can be a package that is installed or a specific file that should be deployed.</p>

<p>By default, these live in <code class="language-plaintext highlighter-rouge">/srv/salt</code>.</p>

<h3 id="grain">Grain</h3>

<p>This is information that is gathered from the minion itself. This for example includes the used OS and its version or the amount of CPUs installed. You can see a full list of available grains by executing the grains.ls command and get the content of a specific grains by using the grains.get command:</p>

<p><code class="language-plaintext highlighter-rouge">salt-ssh yourhost.example.com grains.ls</code><br />
<code class="language-plaintext highlighter-rouge">salt-ssh yourhost.example.com grains.get os</code></p>

<p>Or get the values of all grains:</p>

<p><code class="language-plaintext highlighter-rouge">salt-ssh yourhost.example.com grains.items</code></p>

<h3 id="pillar">Pillar</h3>

<p>This is information that is attached to a minion from the master using defined rules. Together with Jinja Templating in the states, this is the core feature that makes Saltstack really powerful and flexible. By default, there is no pillar data (because they are all provided by the user) but they can be looked at similarly as the grains:</p>

<p><code class="language-plaintext highlighter-rouge">salt-ssh yourhost.example.com pillar.ls</code><br />
<code class="language-plaintext highlighter-rouge">salt-ssh yourhost.example.com pillar.get foobar</code></p>

<p>Or get the values of all pillar data keys::</p>

<p><code class="language-plaintext highlighter-rouge">salt-ssh yourhost.example.com pillar.items</code></p>

<p>By default, these live in <code class="language-plaintext highlighter-rouge">/srv/pillar</code>.</p>

<h3 id="formula">Formula</h3>

<p>A salt formula is not really a different type of data but important enough to be part of the Terminology section regardless.</p>

<p>A formula is a collection of salt states that work together to deploy a complex configuration on a system. There is a collection of formulas available on <a href="https://github.com/saltstack-formulas">Github</a>. They are almost always written to be used together with pillar data. For example the vim formula creates a vimrc based on the provided pillar data.</p>

<h2 id="the-first-states">The first states</h2>

<p>Now that the most common terms are known, the first states can be deployed onto the minion. For this, we will use the vim formula to install and configure vim (because everyone likes to have a common vim configuration in their infrastructure!).</p>

<p>As a first step, we need to add the formula to the master. Since this is the first formula that is added, the directory where they are going to live needs to be created:</p>

<div class="language-plaintext highlighter-rouge"><div class="highlight"><pre class="highlight"><code>mkdir -p /srv/formulas
cd /srv/formulas
git clone https://github.com/saltstack-formulas/vim-formula.git
</code></pre></div></div>

<p>Then, the salt-master needs to be made aware of the new formula. Create the file <code class="language-plaintext highlighter-rouge">/etc/salt/master.d/roots.conf</code> with the following content:</p>

<div class="language-plaintext highlighter-rouge"><div class="highlight"><pre class="highlight"><code>file_roots:
  base:
    - /srv/salt
    - /srv/formulas/vim-formula
</code></pre></div></div>

<p>This formula could now be applied and many formulas might suit your case with their default values but in this case we want to setup the pillar for the vim formula first. For that reason we create the file <code class="language-plaintext highlighter-rouge">/srv/pillar/vim.sls</code> with the following content:</p>

<div class="language-plaintext highlighter-rouge"><div class="highlight"><pre class="highlight"><code>vim:
  managed_vimrc: true
  allow_localrc: true
  config:
    syntax: 'on'
  settings:
    number: ~
    shiftwidth: 4
    tabstop: 4
    softtabstops: 4
    incsearch: ~
    hlsearch: ~
</code></pre></div></div>

<hr />
<p><strong>Hint</strong></p>

<p>The pillar data used by the formula can be seen in the pillar.example file in the top directory of the formula repository.</p>

<hr />

<p>This pillar data is currently not attached to any minion. Create the file <code class="language-plaintext highlighter-rouge">/srv/pillar/top.sls</code> with the following content:</p>

<div class="language-plaintext highlighter-rouge"><div class="highlight"><pre class="highlight"><code>base:
  '*':
    - vim
</code></pre></div></div>

<p>The top file handles which pillar data gets attached to which minion. In this case, the vim pillar data gets attached to <strong>all</strong> minion (denoted by the ‘*’). For more information about targeting minions in the top file, you can have a look at the <a href="https://docs.saltproject.io/en/latest/ref/states/top.html">top file documentation</a>.</p>

<p>At last, the state can be applied. If you are uncertain about what saltstack will do, you can test the state first:</p>

<p><code class="language-plaintext highlighter-rouge">salt-ssh yourhost.example.com state.apply vim test=true</code></p>

<p>Saltstack will tell you to the best of its abilities what each state is going to do. This can be not 100% exact because states can depend on other states having actually run first but it usually is a good indicator.</p>

<p>If you are happy with the shown changes, apply them without the test parameter to have salt-ssh actually make the changes:</p>

<p><code class="language-plaintext highlighter-rouge">salt-ssh yourhost.example.com state.apply vim</code></p>

<p>Congratulations! You made your first actual change with Saltstack!</p>

<p>As a reminder, here is the workflow in short to add a new formula:</p>

<ol>
  <li>Download the formula to /srv/formulas</li>
  <li>Add the directory to the roots.conf file</li>
  <li>Create a file for the pillar data and attach it to the minions.</li>
  <li>Apply the state!</li>
</ol>

<h2 id="highstate">Highstate</h2>

<p>What if one would like salt to remember which states apply to which minions? That is where the Highstate comes into play. Analogous to the pillar top file, there is also a state top file that you can create at <code class="language-plaintext highlighter-rouge">/srv/salt/top.sls</code>:</p>

<div class="language-plaintext highlighter-rouge"><div class="highlight"><pre class="highlight"><code>base:
  '*':
    - vim
</code></pre></div></div>

<p>If you execute the state.apply without any state as a parameter, then Saltstack will apply the Highstate to that minion, meaning all states that match it in the <code class="language-plaintext highlighter-rouge">top.sls</code> in <code class="language-plaintext highlighter-rouge">/srv/salt</code>. With intelligent matching, adding new minions to your infrastructure will be a lot easier because Saltstack will automatically use the correct formulas and pillar data!</p>

<h2 id="next-steps">Next Steps</h2>

<p>From this point on you are equipped to add more formulas from the repository and more systems to the roster to get managed by Saltstack.<br />
If you would like to write your own states or formulas, then have a look at the <a href="https://docs.saltproject.io/en/latest/topics/tutorials/states_pt1.html">States Tutorial</a>.<br />
If you would like to switch from agentless to the standard master-minion architecture, follow the <a href="https://docs.saltproject.io/salt/install-guide/en/latest/">Install Guide</a>.</p>]]></content><author><name>Takios</name></author><category term="linux" /><summary type="html"><![CDATA[Saltstack is a configuration management tool to efficiently administrate systems and define for example what packages should be installed on them or how SSH should be configured. In a usual environment, this is done via an agent on the systems (salt-minion) that connects to a main controlling instance (salt-master). On a smaller scale or if you just do not want to install the salt-minion on the system, salt also offers configuration over plain SSH called salt-ssh.]]></summary></entry><entry><title type="html">How to play Earth 2150 on Linux</title><link href="https://takios.de/2023/11/02/earth-2150-on-linux.html" rel="alternate" type="text/html" title="How to play Earth 2150 on Linux" /><published>2023-11-02T16:00:00+01:00</published><updated>2023-11-02T16:00:00+01:00</updated><id>https://takios.de/2023/11/02/earth-2150-on-linux</id><content type="html" xml:base="https://takios.de/2023/11/02/earth-2150-on-linux.html"><![CDATA[<p>The Earth 2150 trilogy are RTS games released around the year 2000 and have the unique feature that you can design your own units using base models and weapons unlocked through research. Sadly, it does not run that well (or at all) on modern computers out of the box even if Wine is usually better at playing older games than Windows.</p>

<p>However, using the following steps I got it running on a modern Linux again.</p>

<p>For this setup, we are going the use an application called <a href="bottles">Bottles</a> which is a graphical interface for managing Wine environments (usually called prefixes). The distribution used is Linux Mint 21.2.</p>

<h2 id="bottles-installation">Bottles Installation</h2>

<p>Bottles is available as a flatpak. To setup Flatpak on your system, use the <a href="flatpak-setup">Flatpak Setup</a> instructions for your distribution.</p>

<p>Afterwards you can install and run Bottles with the following code:</p>

<div class="language-plaintext highlighter-rouge"><div class="highlight"><pre class="highlight"><code>flatpak install flathub com.usebottles.bottles
flatpak run com.usebottles.bottles
</code></pre></div></div>

<p>Alternatively, head to the <a href="flathub-bottles">Bottles Flathub</a> page, press the Install button and open the downloaded .flatpakref file.</p>

<p><img src="/assets/install_bottles.png" alt="Screenshot of Firefox showing the Flathub page for Bottles and the Linux software center installing it." /></p>

<p>When the installation is completed, press the Launch button.</p>

<h2 id="setting-up-a-bottle-for-earth-2150">Setting up a bottle for Earth 2150</h2>

<p>It is best practice to setup a new Wine environment for every application. These are called prefixes in Wine, Bottles calls them…bottles.</p>

<p>
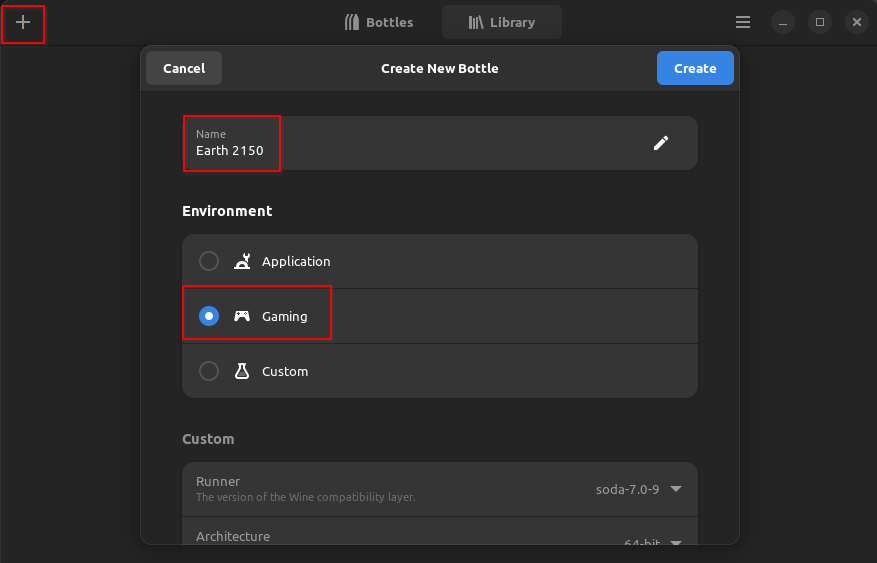
To setup a new bottle, press the + Button in the top-left corner, enter a name for the bottle, choose Gaming in the Environment list and press the Create button.</p>

<p><img src="/assets/bottle_setup_earth_2150.png" alt="Screenshot of creating a bottle for Earth 2150" /></p>

<p>This process will a short while, so you can go on a tea or coffee break now. :)</p>

<p>
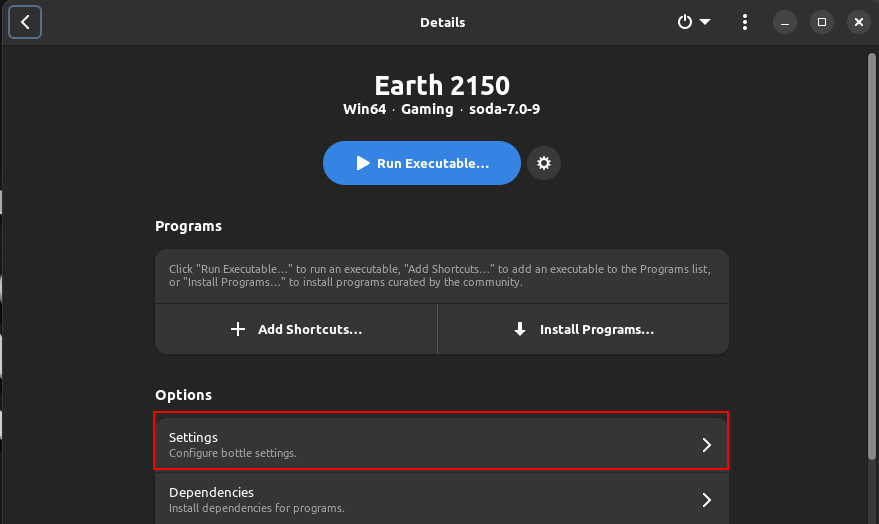
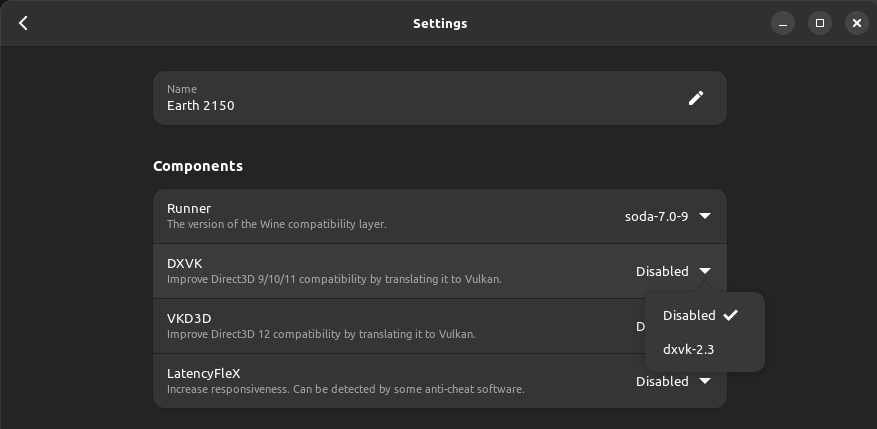
Now open the bottle configuration and disable a feature called DXVK because otherwise the game will crash:</p>

<p><img src="/assets/bottle_settings_earth2150_1.png" alt="Bottle Settings" /></p>

<p><img src="/assets/bottle_settings_earth2150_2.png" alt="Bottle Settings to disable DXVK" /></p>

<h2 id="acquire-the-required-files">Acquire the required files</h2>

<p>Of course, to install the games you need their respective setup files. Personally, I bought the games on GOG. This will give you the following files:</p>

<ul>
  <li>Earth 2150: “setup_earth_2150<em>2.8.7.1</em>(16406).exe”</li>
  <li>The Moon Project: “setup_earth_2150<em>-_the_moon_project_2.1.0.1</em>(16261).exe”</li>
  <li>Lost Souls: “setup_earth_2150<em>-_lost_souls_2.1.0.1</em>(16404).exe”</li>
</ul>

<p>Additionally, some community patches are needed. You can find these on <a href="https://wiki.insideearth.info/wiki/E2150_-_Patches">Inside Earth</a>. They maintain two different patches, one for Single Player and one for Multi Player so download the ones that fits what you want to play.</p>

<p>I am only interested in Single Player, so I’ve downloaded the Single Player patches:</p>

<ul>
  <li>Earth 2150: “escape_from_the_blue_planet_2.8.7.2.exe”</li>
  <li>The Moon Project: “tmp211_patcher.exe”</li>
  <li>Lost Souls: “ls211_patcher.exe”</li>
</ul>

<h2 id="install-earth-2150">Install Earth 2150</h2>

<p>Now you are ready to install Earth 2150. In the overview of the bottle, you can click the big blue Run Executable… button to run anything inside the bottle’s environment. So, if you want to play The Moon Project, you’d first need to execute the “setup_earth_2150<em>-_the_moon_project_2.1.0.1</em>(16261).exe” file and after the install is finished the “tmp211_patcher.exe” file.</p>

<p>After the installater and patcher are done, use the Add Shortcuts button and navigate to <code class="language-plaintext highlighter-rouge">/home/&lt;YOUR USERNAME&gt;/.var/app/com.usebottles.bottles/bottles/Earth-2150/drive_c/GOG Games/Earth 2150 - The Moon Project</code> and select <code class="language-plaintext highlighter-rouge">TheMoonProject.exe</code>. It will now show up in the list of programs for that bottle and you can easily execute it using the Play button besides it.</p>]]></content><author><name>Takios</name></author><category term="gaming" /><category term="linux" /><summary type="html"><![CDATA[The Earth 2150 trilogy are RTS games released around the year 2000 and have the unique feature that you can design your own units using base models and weapons unlocked through research. Sadly, it does not run that well (or at all) on modern computers out of the box even if Wine is usually better at playing older games than Windows.]]></summary></entry><entry><title type="html">Prevent Firefox from switching virtual desktops on KDE</title><link href="https://takios.de/2023/03/31/firefox-kde.html" rel="alternate" type="text/html" title="Prevent Firefox from switching virtual desktops on KDE" /><published>2023-03-31T20:00:00+02:00</published><updated>2023-03-31T20:00:00+02:00</updated><id>https://takios.de/2023/03/31/firefox-kde</id><content type="html" xml:base="https://takios.de/2023/03/31/firefox-kde.html"><![CDATA[<p>I’ve always been annoyed at Firefox insisting on switching to the current active virtual desktop when clicking a link to open in Firefox. For a long time, I had created a KWin rule to force all Firefox windows to stay on one virtual desktop. But what if I wanted to have a Firefox window on another virtual desktop? For example, a guide while playing a video game on desktop 4? That was made impossible with this method so I had to remove that rule each time I needed that and re-add it afterwards.</p>

<p>No more!</p>

<p>I recently stumbled upon a <a href="https://www.reddit.com/r/firefox/comments/x32d3z/linux_ensuring_firefox_opens_on_current_screen/">Reddit post</a> where someone had a similar but not quite my issue. Due to the similarities however, I decided to give it a try and it works! Now Firefox always remains on its current virtual desktop!</p>

<p>Go to <code class="language-plaintext highlighter-rouge">about:config</code> and set <code class="language-plaintext highlighter-rouge">widget.disable-workspace-management</code> to <code class="language-plaintext highlighter-rouge">true</code>.</p>]]></content><author><name>Takios</name></author><category term="firefox" /><category term="kde" /><category term="linux" /><summary type="html"><![CDATA[I’ve always been annoyed at Firefox insisting on switching to the current active virtual desktop when clicking a link to open in Firefox. For a long time, I had created a KWin rule to force all Firefox windows to stay on one virtual desktop. But what if I wanted to have a Firefox window on another virtual desktop? For example, a guide while playing a video game on desktop 4? That was made impossible with this method so I had to remove that rule each time I needed that and re-add it afterwards.]]></summary></entry><entry><title type="html">Using RSS to follow Twitter people without having an account</title><link href="https://takios.de/2022/12/14/twitter-without-account.html" rel="alternate" type="text/html" title="Using RSS to follow Twitter people without having an account" /><published>2022-12-14T14:00:00+01:00</published><updated>2022-12-14T14:00:00+01:00</updated><id>https://takios.de/2022/12/14/twitter-without-account</id><content type="html" xml:base="https://takios.de/2022/12/14/twitter-without-account.html"><![CDATA[<p><strong>Update 01.07.2023:</strong> This method does not work any more due to Twitter restricting access for people without accounts.</p>

<p>With the recent…controversies around the new CEO of Twitter Inc., I want to turn my back on Twitter and delete my account. There is only one problem: There are a lot of people I still want to follow, artists specifically, but who do not have a presence on alternatives like Mastodon. Platforms like Instagram or Tumblr have their issues as well (with Instagram being owned by Meta and Tumblr disallowing “adult content”). Creating accounts on multiple sites where artists have dispersed to is not something I would want to do either. Twitter itself sadly does not offer a nice way to follow artists without an account such as an RSS feed (they scrapped that feature years ago).</p>

<p>There is a nice free and open-source software that can help though: <a href="https://nitter.net">Nitter</a></p>

<p><img src="/assets/nitter_coffe_dad.png" alt="Screenshot of Nitter displaying the coffee_dad Twitter account" /></p>

<p>Nitter allows you to view any Twitter account’s posts via its frontend without actually using a Twitter account yourself. The obvious drawback is that all your requests go through Nitter’s servers first which can have a performance impact. In that case you can install <a href="https://github.com/zedeus/nitter#installation">Nitter on your own server</a>. This also alleviates some privacy concerns that come with using a third-party server like this. I might write a separate article on how to do this in the future.</p>

<p>But how does Nitter help us to not have to use an account to keep up-to-date with people and organizations on Twitter?</p>

<p><img src="/assets/nitter_rss_icon.png" alt="Screenshot highlighting the RSS icon in the Nitter UI" /></p>

<p>In the top right corner, you will find a few icons. The magnifying glass allows you to search for tweets or users, the Twitter icon will send you to the current page’s equivalent on twitter.com. The icon between those however is the important one and allows you to subscribe to the current visible account as an RSS feed! With the use of an RSS reader, you can keep up-to-date on current tweets by subscribing to its RSS feed!</p>

<p>Even though RSS has fallen out of style recently, there are still many different RSS readers available so you can choose which one suits you best.</p>

<p>Personally, I use <a href="https://support.mozilla.org/en-US/kb/how-subscribe-news-feeds-and-blogs">Mozilla Thunderbird’s built-in feed reader</a> because I am already using Thunderbird for my e-mail.  There is also an <a href="https://addons.mozilla.org/en-US/firefox/addon/feedbroreader/">extension available for Firefox</a> or <a href="https://chrome.google.com/webstore/detail/feedbro/mefgmmbdailogpfhfblcnnjfmnpnmdfa">Chrome</a>. Some web-based feed readers are around as well such as <a href="https://www.inoreader.com">Inoreader</a>, but they allow only a limited amount of feeds for free accounts.</p>

<p>Obviously, this is a more complicated way to browse Twitter accounts and I do not blame you if you want to stay on Twitter because it is easier or want to interact with other people instead of just being an observer. At the time of writing this article, I have not deleted my account either as a kind of fallback if this method proves to be insufficient for me. But I do hope this provides a viable alternative for those that wish to leave their Twitter accounts but still like to see what some of their followed accounts are up to.</p>

<p>Got any feedback? You can find me on <a href="https://mastodon.social/@takios">Mastodon</a>.</p>]]></content><author><name>Takios</name></author><category term="twitter" /><summary type="html"><![CDATA[Update 01.07.2023: This method does not work any more due to Twitter restricting access for people without accounts.]]></summary></entry></feed>